Space Invaders Game documentation
List of known bugs:
- No known bugs discovered so far
_____________________________________________________________________
The sprites:
Throughout the development process of the Space Invaders game, there a lot of sprites, objects, sounds and code to make the game function.
For the Space Invaders game I have developed, I have used GameMaker Studio at college and at home and the sprite editor / creator in GameMaker has made the creation process for the sprites a lot easier than using another third party program.
Main sprite:
 |
| sprite_player |
For the main playable sprite, I made dimensions of the sprite 60px wide and 42px high. All this design consists of is the pen tool and the fill tool. I also researched on the internet for design guides and couldn't find one that I was satisfied with, so I found one that was similar to the original and tried to copy it pixel by pixel. I gave it a different colour that fit around the game style. This is the outcome I had with the finished sprite.
 |
| sprite_alien_one |
Enemy sprites:
For the game, I have created three enemy sprites as well as a bonus enemy sprite that appears in the game every so often. Again, after researching on the internet, I couldn't find the identical ones from the original game but I found some that were similar on Google Images and I decided to use those for a guideline to work from and then gave them their own colour of my choice. All this consisted of using the pen tool and the fill tool. For the main three enemies, I made the dimensions 48px wide by 36px high.
 |
| sprite_alien_two |
The green alien is the first enemy and is worth 10 points when destroyed. The purple alien is the second enemy and is worth 20 points when destroyed. The yellow alien is the third enemy and is worth 30 points when destroyed.
I created a bonus enemy that appears every so often in the game. This enemy is worth 100 points.
As you can, I've labelled the sprites that correspond to what they actually are. Everything else that is created in GameMaker is done the same way.
 |
| sprite_alien_three |
If you look closely at the window titles, you can see the name of the element I'm working on.
This image to the left, it shows that I'm working on the third enemy and the numbers in the brackets correspond to the sub-image. In this case, this is the first sub-image of the main image.
 |
| sprite_bonus |
These images to the right show the bonus enemy. The top one is the first sub-image and the bottom one is the second sub-image but in GameMaker, it counts the first sub-image as 0.
For the bonus enemy, I used the dimensions 32px wide by 14px high. To make this sprite, I simply just used the pen tool to mark out the pixels to make the shape.
 |
| sprite_bonus |
I used Google Images to find a replica image and tried to draw it in GameMaker to the best of my ability. The only thing that's different about this image is that I've made two sub-images to make the image flash as it goes across the screen. I chose the colours, red and white because it was created a sense of danger when this went across the screen. It would urge the player to try and destroy this before it disappeared off of the screen.
Other sprites:
The other sprites consist of the barrier that protects yourself when playing the game, the player bullet that you fire at the enemies and the enemy bullet that gets fired at you.
 |
| sprite_barrier |
 |
| sprite_barrier |
 |
| sprite_barrier |
 |
| sprite_barrier |
The images above show the creation process of the barrier for the game. For this sprite, I have created four sub-images with the dimensions 80px wide and 66px high.
I made four sub-images to represent the damage for the sprite. The damage only occurs when the aliens shoot their bullets at the barrier. I have placed four of these in the room so that the player has enough protection.
I simply created these barriers using the pen tool to get shape, then I used the fill tool to give it the colour and then I used the eraser tool for three of the sub-images to give it the damaged look. I designed this sprite from scratch without any templates because I had a rough idea on what it looked like and how I wanted it to look.
 |
| sprite_bullet_alien |
 |
| sprite_bullet_alien |
 |
| sprite_bullet_alien |
 |
| sprite_bullet_alien |
The images above show the creation process of the alien bullet in the game. For the sprite, I have created four sub-images with the dimensions 8px wide and 14px high. The sprite was simple to make as it only consisted of using the pen tool. The bullet was simple to make as it was a random design.
I have used two colours for each of the sub-images and the reason for this is because I wanted to create an animation effect, so that when the aliens shoot at you, it gives the spiral effect when they come towards you. The reason I chose these colours because I wanted to give the player a sense of danger and that they have to destroy those bullets shot by the aliens to get a small amount of score.
 |
| sprite_bullet_player |
 |
| sprite_bullet_player |
These images above show the creation process for the player bullet. I have created two sub-images for this sprite with the dimensions 7px wide and 11px high. The reason for creating two sub-images is because I wanted to create a flashing effect when the bullets were fired from the player and I accomplished that.
The sprite was simple to make. All it consists of is using the pen tool for outlining the bullet and the fill tool for the middle of the bullet. I decided to reverse the colours in order to make it flash the way I wanted it to and I had to choose the colours accordingly so they didn't clash with the background that I have used for the game.
__________________________________________________________________
The objects:
Enemy sprites:
 |
| object_alien |
This image to the left is an object for the aliens. Instead of coding each alien to do the same thing, I decided to make one object and pair all of three objects into one object to make it more efficient rather than having the same code running three times over three objects.
In the create event, this is what it looks like:
 |
| object_alien |
This code is used for setting up the variables for the aliens. Without this code, the game would not function correctly, or better yet, not function at all.
I do not take credit for all of this code, as I followed some YouTube tutorials. "image_speed" is a basic function provided by GameMaker. It controls how fast you want a certain sprite to cycle through the sub-images. The "can_fire" function is my own variable. I created this not just for the aliens, but the for player too. I made it to control how often the aliens can shoot and if they can or can't.
This is the first alarm which is called Alarm 0 and this is what it looks like:
 |
| object_alien |
This code is used for determining whether if the aliens can move left, right or down and whether if they can shoot or not. This code is neat and works effectively. I've been reading a lot of a information on how to properly code in GameMaker and I have learnt quite a bit since the first game I made, which was the ShapeMan game.
This is the second alarm which is called Alarm 1 and this is what it looks like:
 |
| object_alien |
As you can see by the code, it is quite short but effective. This code allows the aliens to shoot again. That's all I can say about this code.
This is the step event and this is what it looks like:
 |
| object_alien |
This code inside the step event controls the alien movement. As you can see, it looks complicated but it really isn't. The code is basically saying if the aliens x position is less than 16px, it will move to the right, if the aliens x position is more than 960px, it will move to the left and if the aliens y position is more 512px, the room will restart.
 |
| object_bonus |
There isn't much that functions the bonus object in the game. Just a create event and a step event.
Again, without these, this object would have no purpose of being in the game because it would be doing nothing.
This is the create event for the bonus object and this is what it looks like:
 |
| object_bonus |
There isn't a lot of code for the create event. The "hspeed" variable controls how fast the object moves across the screen. I have set it to 1.8 because it's not too fast or too slow. This number can be altered to a higher number or a lower, depending on your preference. The "image_speed" variable how fast GameMaker cycles through sub-images. Because this object has two sub-images, I have it set to a low speed but if I had more sub-images, I would have to increase the speed so the cycling isn't too slow. Again, this variable can be increased, decreased or removed.
This is the step event and this is what it looks like:
 |
| object_bonus |
Again, there isn't much to this code. It's really self explanatory. The code is basically saying if the x position of the bonus object exceeds the room width which is 1024px, the object will be destroyed.
Main sprite:
 |
| object_player |
As you can see, there are a lot of events going on that make the main player function correctly.
Without these, the game wouldn't function like it does now.
This is the create event and this is what it looks like:
 |
| object_player |
In the create event, there isn't a lot of code but it is important code that is required for the game to work.
What this code is doing is initialising variables for the game to work properly. Instead of making a controller object, I have decided to add the variables to the main player object because I know the object is there at all times and it's also less resources that are being used.
Some of the variables in this code are not all for the main player, some are for the aliens and just for the game in general.
The alien count can be changed quite easily, the only thing you would have to do is place more enemies by editing the room. It can be any of the enemies or just a specific one. The line of code below it, is also for the alien. It allows the alien to move left if needed and this is called in other pieces of the code. The lives for the main player are set to three but can be increased by changing the number to your desired choice. Instead of using GameMakers' scoring system, I have decided to make a global variable for the score and it can be changed quite easily if you want the player to start off with a specific score.
This is the first alarm which is called Alarm 0 and this is what it looks like:
 |
| object_player |
There isn't that much code for this alarm event. This code doesn't control the firing rate for the player, but this allows the player to shoot again after they have fired so many bullets. It's basically used to stop the player from spamming or holding the space bar for a long period of time to create numerous bullets to kill the aliens with. That's all I can say about this piece of code.
This is the second alarm which is called Alarm 1 and this is what it looks like:
 |
| object_player |
Again, this is code is very short but it is effective. What this code does is, it stops you from leaving the room. Out of all the methods I tried, this one worked the best. I set up collision points so the player would bounce off of the wall when it collided with it and it wasn't effective enough and often became buggy. I also made an invisible wall and placed that on both sides of the room and sometimes the player got stuck to it and was unable to become unstuck from the wall. After reading several online forums about GML (GameMaker Language), I stumbled upon this and I tried it with my variable and it worked like a charm.
This is the third alarm which is called Alarm 2 and this is what it looks like:
 |
| object_player |
This code is very self-explanatory. What this piece of code does is, it creates the bonus enemy using the same alarm it is in. You can change the numbers depending on your preference. You can either change it so they are frequently spawning or have a long pause in between each one. After spending some time on this, it took a while to get the right outcome and I'm happy with the result. The first few tries of altering the numbers, they were still spawning frequently and after researching on how the alarms work, I experimented some more and these numbers work really well.
This is the step event and this is what it looks like:
 |
| object_player |
This is where all of the players' movements and shooting comes into action. I decided to code the keyboard inputs in because I thought it was too simple to use the D&D (Drag and Drop) function in GameMaker, and I knew how to code the keyboard inputs in before hand.
As you can see at the bottom of the code, you can see how many lives you need to have in the game before it restarts. This depends on how many lives you have set the player up with before the game starts. In this case, I have set the player up with three lives and when they have less than one life, it restarts rather than setting it to zero, because it gives the player four lives instead of three lives. As you can see, alarm 0 is called because that's when the player is allowed to fire their weapon again. This can be changed depending on your preference. For example; if you want the player to fire constantly, remove the alarm and if you don't want the player to fire constantly, increase the alarm time so the player can only shoot a certain amount of bullets before they can shoot again.
This is the draw event and this is what it looks like:
 |
| object_player |
This draw event is quite simple in what it does. Instead of creating an invisible object to put in the room to display the score and lives, I decided to add it to the player. The reason for this is because it's less resources used in GameMaker and I think it's more efficient.
These values can be changed depending on your preference. It took me a while to get the score and lives drawn correctly. I had to do some research on how the pixels worked in the room editor. After figuring it out, I got it working the way I wanted it to. The font can be changed to and the font I chose to display the score was a pixelated font and I thought that suited the style of the game.
Other sprites:
 |
| object_barrier |
As you can see, there isn't a lot of events here for the barrier to work properly.
The rest of the functions for the barrier are scattered over the other objects.
This is the create event and this is what it looks like:
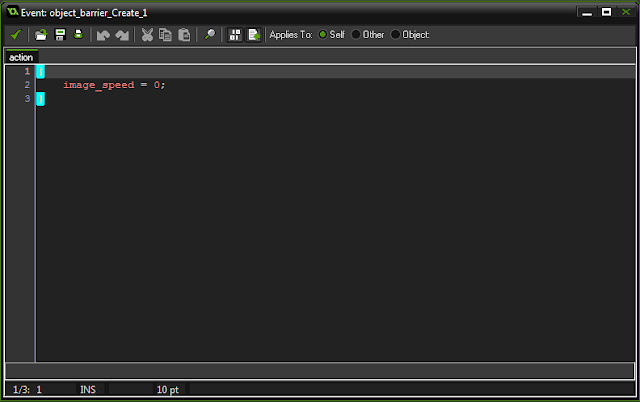 |
| object_barrier |
This code is really self-explanatory. What this code does is, it stops the object from cycling through the sub-images. This is a good thing because the sub-images only need to change when the bullets from the aliens collide with the barrier.
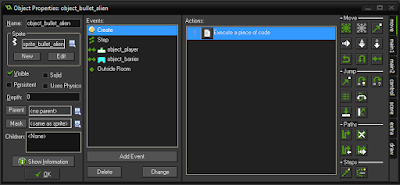 |
| object_bullet_alien |
As you can see, there is quite a few events that are taking place for the alien bullet.
Without these events, the alien bullet becomes useless.
This is the create event and this is what it looks like:
 |
| object_bullet_alien |
This code is quite important because this is what makes the alien bullet move. This value can be changed depending on your preference. I played around with this until I found the value I was comfortable with.
This is the step event and this is what it looks like:
 |
| object_bullet_alien |
This code is quite short but effective. What this code does is, it checks whether the player is visible and if the player isn't visible, the bullet from the alien gets destroyed. The reason that I have included this into the game is because it makes the game run smoother rather than keeping the instances in the background. Storing instances in the background is quite inefficient for the game because it requires memory and if the memory gets used up, the game can often crash.
This the first collision with the player and this is what it looks like:
 |
| object_bullet_alien |
This code is quite important to the game and the reason for it is because this controls what happens when the player gets hit by a bullet from the aliens. Without this code in the game, it would end up on a loop of replaying the game.
The code is basically saying that if the player is visible and the bullet collides with the player, take one life away from the player, make the player not visible for a set time and then make the player visible again.
This is the second collision with the barrier and this is what it looks like:
 |
| object_bullet_alien |
This code is quite simple and it is also important for the game. The reason this code is here is because it controls when the barrier disappears. When the alien bullets collide with the barrier, it changes the sub-image but when there are no sub-images left to change to, this code destroys the barrier by checking if there are more sub-images or not and when it has decided there isn't, the barrier gets destroyed. By changing the values in this code, you will need to add more sub-images to the sprite to even it out so it works efficiently and correctly.
This is the outside room event and this is what it looks like:
 |
| object_bullet_alien |
This piece of code is self-explanatory but again, quite important to have in the game. The reason I have added this is because it makes the game run more efficiently by destroying objects that can't be seen in the game. That's all I can say about this code.
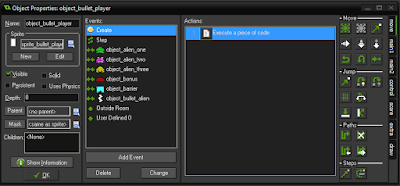 |
| object_bullet_player |
As you can see, there is a lot of events going on for the bullet for the player.
The player bullet would not function correctly without these events.
This is the create event and this is what it looks like:
 |
| object_bullet_player |
There isn't a lot too this code, but it is quite important for the game. What this code does is, it controls how fast the players bullet travels and also controls speed of how fast it cycles through the sub-images. I have set it to a low speed so the flashing on the bullet is not too fast or too slow. As you can see, the vspeed is a minus number and the reason for that is because GameMaker works out the x and y axis in a different way. For example; for the hspeed, you will have to use a minus number to go to the left and a positive number to go to the right, and for the y axis, you need a minus number to move up and a positive number to down. That's all there is to say about this code.
This is the step event and this is what it looks like:
 |
| object_bullet_player |
This code is the same as the code in the alien bullet. This code is quite short but effective. What this code does is, it checks whether the player is visible and if the player isn't visible, the bullet from the player gets destroyed. The reason that I have included this into the game is because it makes the game run smoother rather than keeping the instances in the background. Storing instances in the background is quite inefficient for the game because it requires memory and if the memory gets used up, the game can often crash.
This is the first collision even with the first alien and this is what it looks like:
 |
| object_bullet_player |
This is code is quite simple. What this code does is, it gives the score for the alien you have destroyed. For destroying this alien, you get 10 score points per one you destroy.
This is the second collision event with the second alien and this is what it looks like:
 |
| object_bullet_player |
This is code is quite simple. What this code does is, it gives the score for the alien you have destroyed. For destroying this alien, you get 20 score points per one you destroy.
This is the third collision event with the third alien and this is what looks like:
 |
| object_bullet_player |
This is code is quite simple. What this code does is, it gives the score for the alien you have destroyed. For destroying this alien, you get 30 score points per one you destroy.
This is the fourth collision with the bonus enemy and this is what it looks like:
 |
| object_bullet_player |
This is code is quite simple. What this code does is, it gives the score for the bonus enemy you have destroyed. For destroying the bonus enemy, you get 100 score points per one you destroy.
This is the fifth collision with the barrier and this is what it looks like:
 |
| object_bullet_player |
This is code is quite simple. What this code does is, it destroys the players bullet when it collides with the barrier. The reason I have done this is because if the bullet doesn't reach outside of the room, it gets destroyed when it hits the barrier. This is also good for the game because it destroys the resource because it's not being used and it betters the performance of the game.
This is the sixth and final collision with the alien bullet and this is what it looks like:
 |
| object_bullet_player |
The reason I have added this code into the game is because it gives the player two chances to defend themselves. One of the ways of defending themselves is by hiding behind a barrier and the other way is destroying the alien bullets when they come towards you. The player then gets 5 score points per one they destroy.
This is the outside room event and this is what it looks like:
 |
| object_bullet_player |
The reason I have added this is because if the player doesn't destroy an alien or misses the alien, the bullet then can travel outside of the room and get destroyed. This is good for the game because it makes it efficient and not keep the resources stored in the background doing nothing but taking up the memory that is needed to run the game.
This is the user event and this is what it looks like:
 |
| object_bullet_player |
This is quite important to the game because what this does is, it monitors how many aliens are left in the game. When you destroy an alien, this code kicks in and decreases the amount by how many you have destroyed.
__________________________________________________________________
The room:
When the enemies are placed in the room, they look bigger the original dimensions and the reason for that, is because I have stretched them out because after making them, I realised that they were too small for the room. Each of the enemy sprites have a total of two sub images and my reason for doing this is to create an animation effect for when they move.
 |
| rm_play |
This isn't the actual size of the room. I opened the room editor and zoomed out to show how the room looks with the settings I have chosen on the left hand side. Before making the game, I was initially going to have a smaller room and then when it come to making the game, it looked better on the larger resolution rather than the smaller resolution.
_____________________________________________________________________
The organisation:.
These images above show how organised my elements are for the game, which means that nothing is difficult to find and it's where it is supposed to be. Having everything organised like this in GameMaker has made things easy for me to go back and change if I ever need to add or edit the elements.
_____________________________________________________________________
Menu stuff:
Buttons:
 |
| sprite_menu_button_play |
This is the first button for the menu and this starts the game. The button consists of two sub-images. I made this button using the pen tool to create the outline for the letters. I duplicated the first sub-image to create the second sub-image and used the fill tool. The image below is the second sub-image of the button. The dimensions for the play button are 182px wide and 46px high.
 |
| sprite_menu_button_play |
 |
| sprite_menu_button_help |
This is the second button for the menu and this displays important information about the game such as the controls, the enemies and the score for the enemies. I created these buttons by using the pen tool for the outline of the text and then the fill tool. The image below is the second sub-image of the button. The dimensions for the help button are 182px wide and 46px high.
 |
| sprite_menu_button_help |
 |
| sprite_menu_button_about |
This is the third button for the menu and this tells the player about the game and what to do. I created these buttons by using the pen tool to outline the letters and then the fill tool. I duplicated the first sub-image for the second sub-image and filled it a different colour and the image below is the second sub-image of the button. The dimensions for the about
button are 231px wide and 46px high.
 |
| sprite_menu_button_about |
 |
| sprite_menu_button_quit |
This is the fourth button on the menu and this allows the player to quit the game whenever they feel like it. I created these buttons by using the pen tool to draw the outline of the letters and then used the fill tool. I duplicated the first sub-image to create the second sub-image and then used the fill tool to change the colour. The image below is the second sub-image of the button. The dimensions for the quit button are 151px wide and 46px high.
 |
| sprite_menu_button_quit |
 |
sprite_menu_button_yes
|
This button is a sub button for the game over screens in the game. This allows the player to either restart the game or end the game if they do not want to play anymore. I created these buttons by using the pen tool to draw the outline of the letters and then the fill tool. To give this button the same effect as the other buttons, I duplicated this sub-image and made a second image and I changed the colour of this sub-image by using the fill tool. The dimensions for the yes button are 64px wide and 26px high.
 |
| sprite_menu_button_yes |
 |
sprite_menu_button_no
|
This button is a sub button for the game over screens in the game. This allows the player to either restart the game or end the game if they do not want to play anymore. I created these buttons by using the pen tool to draw the outline of the letters and then the fill tool. To give this button the same effect as the other buttons, I duplicated this sub-image and made a second image and I changed the colour of this sub-image by using the fill tool. The dimensions for the no button are 42px wide and 26px high.
 |
| sprite_menu_button_no |
Functionality of the buttons:
 |
| object_menu_button_play |
The image to the left shows the events that makes the play button work on the menu.
Without these events, the button becomes pointless.
This is the create event and this is what it looks like:
 |
| object_menu_button_play |
This code is quite short but effective. What this code does is, it stops the sprite from cycling through the sub-images, which is what we want because we want the object to change index when the mouse is hovering over the sprite.
This is the left mouse event and this is what it looks like:
 |
| object_menu_button_play |
There isn't much to this event. What this does is, it detects whether if the object is clicked or not and if it is, it will start the game. I could have used code for this but it was much easier just to use the D&D (drag and drop) in GameMaker to setup this event.
This is the mouse enter event and this is what it looks like:
 |
| object_menu_button_play |
There isn't much to this event but what this piece of code does is, it changes the sprite image index, which in other words, changing the sub-image. So when the mouse hovers over this button, this code kicks in and changes the sprite to the second sub-image.
This is the mouse leave event and this is what it looks like:
 |
| object_menu_button_play |
There isn't much to this event but what this piece of code does is change the sprite image index, which in other words, changing the sub-image. So when the mouse hovers over this button, this code kicks in and returns the object back to its default sub-image.
 |
| object_menu_button_help |
The image to the right shows the events that makes the help button work on the menu.
Without these events, the button becomes pointless and the player wouldn't be able to see how to play the game.
This is the create event and this is what it looks like:
 |
| object_menu_button_help |
There isn't that much code for this button to work properly but what this code does is, it stops the sprite from cycling through the sub-images.
This is the left mouse event and this is what it looks like:
 |
| object_menu_button_help |
This event actually makes the button work. I could have used code to do this but I thought it was easier to use the D&D (drag and drop) function in GameMaker.
This is the mouse enter event and this is what it looks like:
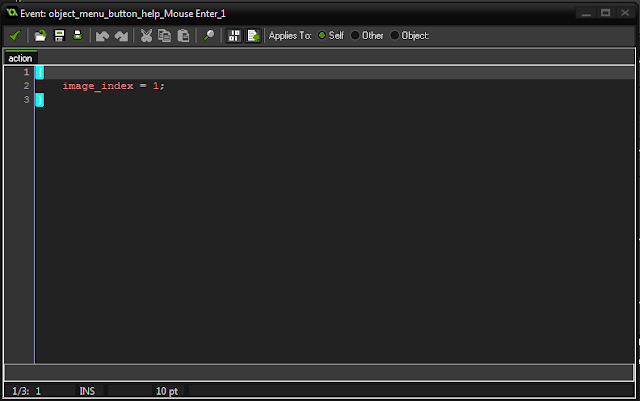 |
| object_menu_button_help |
This code is important to this button, because this is what makes it light up when you hover the mouse over the button. This code changes the sprite sub-image to the next one, so that when you hover the mouse over the button, it changes to the next sub-image.
This is the mouse leave event and this is what it looks like:
 |
| object_menu_button_help |
There isn't much to this event but what this piece of code does is, it reverts the sprite image index, which is the sub-image back to the default one that the sprite is setup to use. So when the mouse hovers over this button, this code kicks in and returns the object back to its default sub-image.
 |
| object_menu_button_about |
This image to the left shows the events I have used to make this button function properly.
Without these events, the button would be just object that has no purpose of being there.
This is the create event and this is what it looks like:
 |
| object_menu_button_about |
This code is quite important for the menu, because this stops the sprite from cycling through the sub-images.
This is the left mouse event and this is what it looks like:
 |
| object_menu_button_about |
This a D&D (drag and drop) event to tell the button to go to a room. In this case, this button is for the about screen on the menu. Without this function, the button would have no reason to be on the menu screen.
This is the mouse enter event and this is what it looks like:
 |
| object_menu_button_about |
This code is important to this button, because this is what makes it light up when you hover the mouse over the button. This code changes the sprite sub-image to the next one, so that when you hover the mouse over the button, it changes to the next sub-image.
 |
| object_menu_button_about |
This code is important to this button, because this is what makes it light up when you hover the mouse over the button. This code changes the sprite sub-image to the next one, so that when you hover the mouse over the button, it changes to the next sub-image.
 |
| object_menu_button_quit |
The image to the right shows the events that make up the quit button.
Without these events, the quit button wouldn't function at all.
This is the create event and this is what it looks like:
 |
| object_menu_button_quit |
This code is important to the button and the reason for this is because it stops the object from cycling through its available sub-images.
This is the mouse enter event and this is what it looks like:
 |
| object_menu_button_quit |
This code is important for the button because this is what makes the button change when the mouse is hovering over the button. The code is telling the button to change sub-image when the mouse is in contact with the button.
This is the mouse leave event and this is what it looks like:
 |
| object_menu_button_quit |
This code is important for the button because this is what makes the button change when the mouse is hovering over the button. The code is telling the button to change sub-image when the mouse is not in contact with the button.
This is the left mouse event and this is what it looks like:
 |
| object_menu_button_quit |
This code is also important and the reason for this is because it allows the player to exit the game at any time. Without this code, the player wouldn't be able to exit the game properly without force ending it. I could have used D&D (drag and drop) for this button, but I decided to use code instead.
 |
| object_menu_button_back |
This image above, shows the events that make up this button and without these events, the button would be pointless and useless.
This is the create event and this is what it looks like:
 |
| object_menu_button_back |
What this code does is, it prevents the image on the button cycling through all of the available sub-images which is the result I was looking for.
This is the left mouse event and this is what it looks like:
 |
| object_menu_button_back |
This a D&D (drag and drop) event to tell the button to go to a room. In this case, this button is for the about screen on the menu. Without this function, the button would have no reason to be on the menu screen.
This is the mouse enter event and this is what it looks like:
 |
| object_menu_button_back |
This code is important for the button because this is what makes the button change when the mouse is hovering over the button. The code is telling the button to change sub-image when the mouse is in contact with the button.
This is the mouse leave event and this is what it looks like:
 |
| object_menu_button_back |
This code is important for the button because this is what makes the button change when the mouse is hovering over the button. The code is telling the button to change sub-image when the mouse is not in contact with the button.
 |
| object_menu_button_yes_q1 |
This image to the right, shows the events that make up this button and without these events, the button would be pointless and useless.
This is the create event and this is what it looks like:
 |
| object_menu_button_yes_q1 |
This piece of code is quite important for the button and the reason for this is because this prevents the button from cycling through the sub-images, which is the result I wanted.
This is the left mouse event and this is what it looks like:
 |
| object_menu_button_yes_q1 |
There isn't much to this event, but what this does is, it detects whether if the object gets clicked or not. In this case, if the button was clicked, it would start the game. I used code for this rather than D&D (drag and drop) in GameMaker to setup this event.
This is the mouse enter event and this is what it looks like:
 |
| object_menu_button_yes_q1 |
This code is quite short but at the same time, it's important. What this code does is, it changes the button state when the mouse is hovering over it. It does this by using the image index code to change the sub-image of the sprite.
This is the mouse leave event and this is what it looks like:
 |
| object_menu_button_yes_q1 |
This code is quite short but at the same time, it's important. What this code does is, it changes the button state when the mouse is not hovering over it. It does this by using the image index code to revert the button state by changing the image index of the sprite back to the default index it was in the first place.
 |
object_menu_button_yes_q2
|
This image to the left, shows the events that make up this button and without these events, the button would be pointless and useless.
This is the create event and this is what it looks like:
 |
| object_menu_button_yes_q2 |
This piece of code is quite important for the button and the reason for this is because this prevents the button from cycling through the sub-images, which is the result I wanted.
This is the left mouse event and this is what it looks like:
 |
| object_menu_button_yes_q2 |
There isn't much to this event, but what this does is, it detects whether if the object gets clicked or not. In this case, if the button was clicked, it would start the game. I used code for this rather than D&D (drag and drop) in GameMaker to setup this event.
This is the mouse enter event and this is what it looks like:
 |
| object_menu_button_yes_q2 |
This code is quite short but at the same time, it's important. What this code does is, it changes the button state when the mouse is hovering over it. It does this by using the image index code to change the sub-image of the sprite.
This is the mouse leave event and this is what it looks like:
 |
| object_menu_button_yes_q2 |
This code is quite short but at the same time, it's important. What this code does is, it changes the button state when the mouse is not hovering over it. It does this by using the image index code to revert the button state by changing the image index of the sprite back to the default index it was in the first place.
 |
| object_menu_button_no_q1 |
This image to the right, shows the events that make up this button and without these events, the button would be pointless and useless.
This is the create event and this is what it looks like:
 |
| object_menu_button_no_q1 |
This piece of code is quite important for the button and the reason for this is because this prevents the button from cycling through the sub-images, which is the result I wanted.
This is the left mouse event and this is what it looks like:
 |
object_menu_button_no_q1
Instead of using a D&D event, I decided to use code for this event. This code is for the "no" button on the first check screen. When the button is pressed, it moves you back to the check screen. Without this code, the button would have no reason to be there.
|
This is the mouse enter event and this is what it looks like:
 |
object_menu_button_no_q1
This code is important to this button, because this is what makes it light up when you hover the mouse over the button. The code changes the sprite sub-image to the next one.
|
This is the mouse leave event and this is what it looks like:
 |
| object_menu_button_no_q1 |
This code is important to this button, because this what stops the button from lighting up when the mouse isn't hovering over it. When the mouse isn't hovering over the button, it changes the sub-image back to the previous one.
 |
object_menu_button_no_q2
This is the left mouse event and this is what it looks like:
|
This image to the left, shows the events that make up this button and without these events, the button would be pointless and useless.
 |
| object_menu_button_no_q2 |
What this code does is, it prevents the button from cycling through all of the available sub-images which is the result I was looking for.
This is the left mouse event and this is what it looks like:
 |
| object_menu_button_no_q2 |
For this event, I used a short piece of code that works the same way as the D&D (drag and drop) event. What this code is doing, is that it's telling the button to go to the chosen room. In this case, the code is telling the button to go back to the main menu screen.
This is the mouse enter event and this is what it looks like:
 |
| object_menu_button_no_q2 |
This code is important for the button because this is what makes the button change when the mouse is hovering over the button. The code is telling the button to change sub-image when the mouse is in contact with the button.
This is the mouse leave event and this is what it looks like:
 |
| object_menu_button_no_q2 |
This code is important for the button because this what makes the button change when the mouse is not hovering over the button. The code is telling the button to revert the sub-image back to default when the mouse is not in contact with the button.
Logo:
 |
| sprite_menu_logo |
This the main logo for the menu screen. The dimensions of this image are 514px wide and 33px high. I did not make this image from scratch, I found a font on http://www.dafont.com and installed it to my computer. I then used Adobe Photoshop to create this logo and then used the sprite editor in GameMaker to make 77 sub-images for the logo to light up each letter. Each sub-image I made in GameMaker, I filled in one line pixels in the letter at a time and then I used code to create the animation effect. After playing around with the numbers, I found a nice number that I'm comfortable with and the animation isn't too fast or too slow.
_____________________________________________________________________
The final outcome:
This is the main menu screen that you are presented with when the game is started from GameMaker. All this consists of is a few objects like the buttons and a set background colour.
Clicking the help button from the menu screen shows this screen. This displays important information for the game such as how many points an enemy worth and the controls to play the game.
Clicking the about button from the menu screen shows this screen. This displays information about the game and what the objective of the game is.
Video of gameplay for the game:
https://youtu.be/Pj3Qa_A7fNY?t=12m36s


 Clicking the about button from the menu screen shows this screen. This displays information about the game and what the objective of the game is.


